Even the most reliable taps eventually begin to let water through - they flow or drip. To fix a tap it is not always necessary to call a plumber. Most breakdowns can be fixed on their own. But, before you repair a dripping tap, you need to understand its design and the order of work.

Do it yourself with your own hands
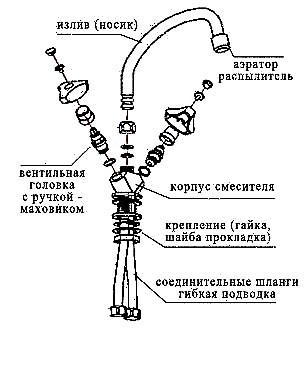
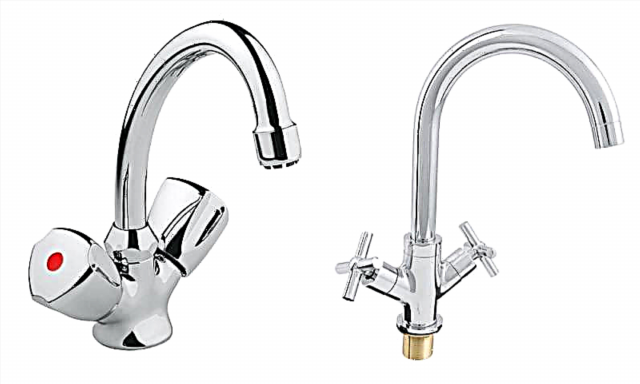
Let's start with the definitions. There are taps and taps in the bathroom and in the kitchen. Faucets only supply water, mixers also allow you to adjust its temperature by mixing two streams - cold and hot water. In this article we will talk specifically about cranes and how to repair them. Mixer repair is very similar, but has its own characteristics. By the way, repair of single lever mixers can be found here.
There are several types of faucets for bathroom or kitchen:
- valve
- single-lever (also called cartridge or flag).
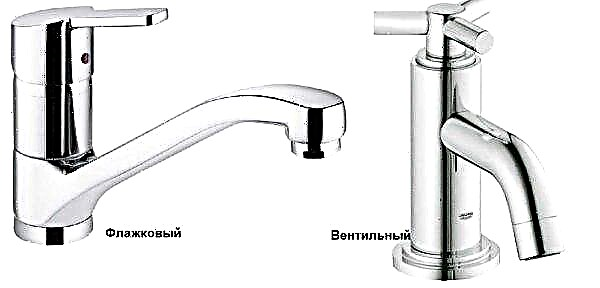
Cranes - flag and valve
Their device is different, so the repair, even with the same damage, is significantly different. Therefore, each of the species will be considered separately.
Do-it-yourself valve repair
Valves can be called classics of water supply. And, although they are gradually being superseded by new designs, there are still plenty of them. Their internal structure over the decades has not changed. Only the design has changed - it has become more diverse and refined. Today you can find both the most ordinary models and very exotic ones.
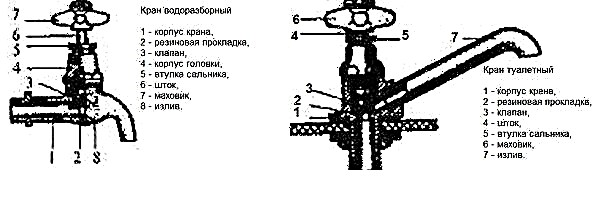
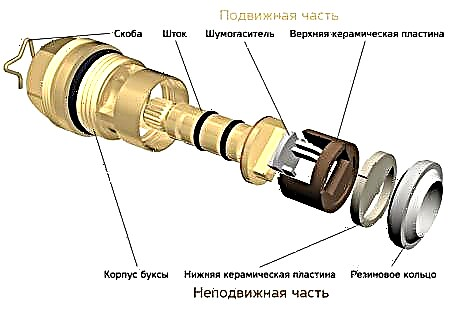
Valve Structure
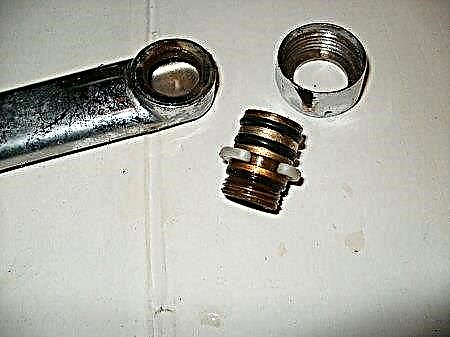
Cranes of this type are still used, as they are simple and reliable, they serve not for years but for decades. If the entire “filling” is of proper quality, all that can fail during this time is gaskets. Their replacement - this is the main way to fix the valve.
Replacing rubber pad
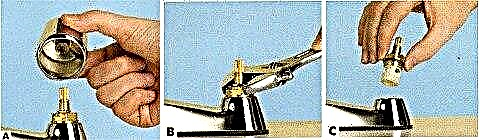
If the valve in the kitchen or in the bathroom continues to drip when the valve is completely closed, the most likely reason is the gasket on the valve that has lost its elasticity (see photo in the next paragraph). She stopped pressing tightly against the saddle, which is why water continues to flow and sometimes the tap does not just drip, but even flows. In this case, repair the tap - replace the gasket. To do this, you need a wrench, or better - an adjustable wrench and a set of gaskets.
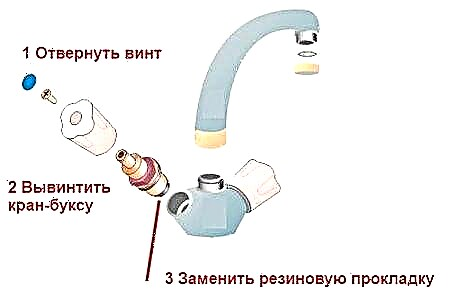
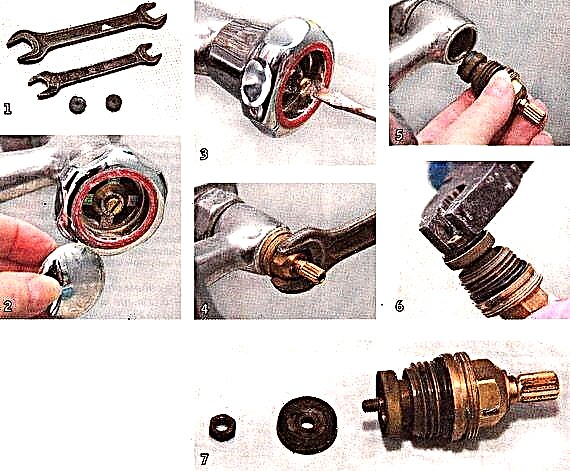
Before you repair a dripping tap, turn off the water supply (you can completely, you can only in this thread, if possible). Further, it is worthwhile to make sure that the water is still blocked. Water does not flow - we begin repair. You need a wrench or adjustable wrench. They will need to unscrew the head housing (upper part of the housing).
It is better to work with an adjustable wrench. In order not to damage the surface during the operation, wrap it with a soft cloth, and then attach the key. Unscrewing the head, take out the valve. Now you can replace the gasket or put a new valve. The old one is hooked with something sharp - you can use a screwdriver with a flat blade, you can use an awl, etc.
When choosing a gasket, note that its edges should be beveled at about 45 °, otherwise the plumbing will make noise during operation. If this is not in your arsenal, you can trim the edge with something sharp - a knife or scissors.
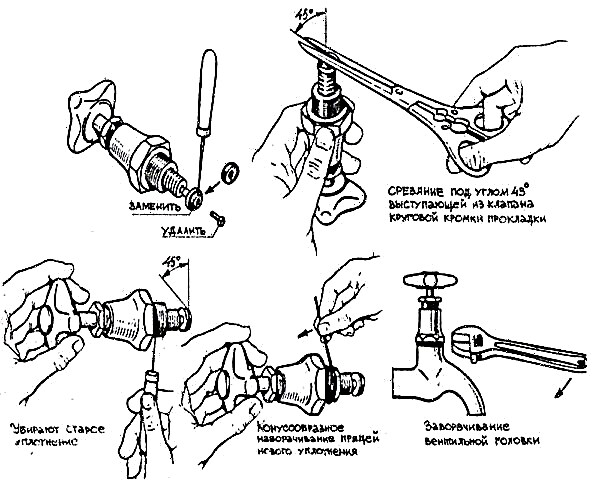
Replacing the gasket in the tap in the pictures
If there is no suitable gasket, it can be cut from a sheet of dense rubber (porous does not fit). The thickness of the rubber sheet or gasket is 3.5 mm, the inner diameter is slightly less than the diameter of the stem, the outer one should not protrude. Do not forget about bevelled edges at 45 °.
After installing the gasket, put the valve in place, tighten the head. New models do not require winding on the thread. Moreover, the winding is contraindicated - it can cause a crack in the case.If the old crane of the times of the USSR is being repaired, a tow is laid on the thread, lubricated with packing paste, then screwed. After that, you can gradually turn on the water.
Sometimes the opposite story happens with this gasket on the valve - water does not flow or barely oozes. In this case, the gasket flew off the stem and blocked the flow of water. First, you can try to open / close the tap a couple of times, and if it does not help, you need to repeat the above operation, that is, fix the tap by replacing the gasket. Just remember to remove the old one that has stuck to the saddle.
Water trickles out from under the rod
If water drips from under the valve, seals are likely to wear out. There are two ways to fix a tap with a leak from under the rod. For starters, you can try to tighten the head housing more tightly. Do it again with an adjustable wrench. Use of pliers is undesirable, as traces remain after them. Tighten the head as much as possible (just don't overdo it).

The structure of the valve
If the thread is tightened as much as possible and the water continues to trickle, the gaskets on the gland must be replaced. To do this, first turn the tap to the limit, then again remove the tap head, pry off something sharp and remove both rubber rings, replacing them with new ones.
Water does not overlap
If the gasket is changed, and the water does not overlap, when the tap rotates, the thread breaks, it is necessary to change the stem - the thread on it was worn. There are two options - to replace the stem itself or the entire valve head.

There may be a scull in the saddle
If the thread is not worn, the gasket is new, but the valve is leaking, inspect the seat. A ravine may appear in it. It forms gradually - it is washed out by water supplied with high pressure. If the gasket in some place is pressed loosely, a shell forms in this place. Sometimes water undermines completely the entire circumference, forming sharp edges, which quickly damage the gasket. Ravine and sharp edge must be removed. Take a regular screwdriver and dull the sharp edge along it along the edge. The same operation can be done using a file or a piece of sandpaper with fine grain. The main thing is to achieve a smooth (as possible) and non-sharp edge.
How to fix a cartridge tap
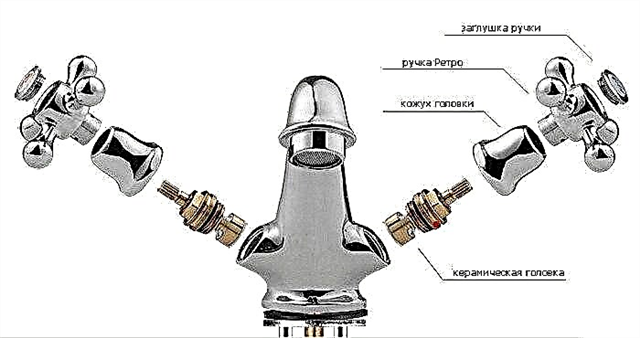
Most often, in the bathroom or in the kitchen they put taps with one lever. From also called flagged or single-lever. For opening / closing water in it, a special device is responsible - a cartridge, because they are also called cartridge.

Inside the cartridge there are two plates with holes. The lower one is fixed rigidly, and the upper one is movable. A rod is attached to it, and it, in turn, is attached to the handle. Turning the handle, we move the rod, and it shifts the movable plate, which opens / closes the water and changes its pressure.
If there is a problem with such a tap, it can only be repaired by replacing the cartridge. The main problem in them is that they begin to flow - water oozes or drips from under the handle. To repair a current or dripping cartridge valve, replace the cartridge. The only way.
Cartridge replacement
The first step is to shut off the water, then remove the handle. To do this, first remove the colored plug - it closes the screw. Unscrewing the screw, the handle is pulled up, separating from the stem. After the handle is removed, unscrew the clamping ring - it holds the cartridge. Now it remains only to take it out.
Then, together with the cartridge, you need to go to a store or market, buy exactly the same. The new one should be the same in size, the holes in its lower part should have the same shape and arrangement. In general, you need to find an exact copy.

How to disassemble a cartridge tap
Assembly takes place in the reverse order:
- put the cartridge (strictly vertically, scrolling a little around its axis so that the protrusions in the case fall into the recesses on the cartridge),
- tighten the clamping nut
- install the handle
- screw in the fixing screw
- insert the cap.
An initial check can be done after the pressure ring has been installed. You can open the water and check if the tap is now leaking.
If the water flow has become too weak
Most modern taps are equipped with a spout mesh that retains solid particles that may be contained in the water supply. If gradually the water jet does not become so elastic, and the pressure on other taps has not changed, the reason is the clogging of this mesh. In this case, the crane can be repaired in a couple of minutes.

I need to clean the grid
Unscrew the nut with the grid, which is located at the end of the spout. Rinse it, clean the clogged holes (you can use a needle or an old toothbrush). Replace the cleaned mesh.
Possible causes of failure
At first it’s worth finding out why the tap is flowing. Often, the main problems in the failure of a plumbing fixture are damage to the seals, gaskets, as well as an extended service life. If the faucet began to drip after purchase, then perhaps this is a factory defect. But in order to perform a quality repair, it is worth understanding the features of breakdowns.
Leakage may occur due to the following reasons:
- gasket wear
- oil seal wear
- ball cartridge contamination,
- low-quality installation
- mixer wear.


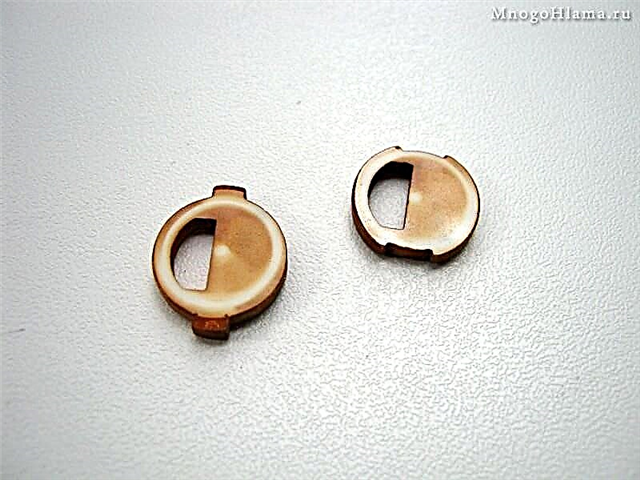
A common defect in the bathroom faucet is gasket wear. A gasket is a rubber element that acts as a seal between the connection in the tap when it is closed. If this element begins to wear out, then the mixer begins to drip slowly and as it wears, the dripping goes into a leak. Usually the gasket changes every 7-8 years.
Another common cause of leakage from the tap is wear on the stuffing box. The thing is that the sealing stuffing box can wear out over time. To determine this symptom is quite simple - in the closed state no defects or breakdowns of the mixer are visible, but as soon as the tap is opened, water immediately flows out from under all the valves.
The design of the mixer has features - elements that are quickly contaminated when exposed to mechanical components contained in tap water are installed inside. To eliminate leakage of the crane it is required to completely disassemble and conduct a high-quality cleaning of all parts.
Errors made during the installation process will soon become the cause of the mixer failure and leakage. Strong tightening of the nut will damage the gasket and this will accelerate its further wear. If there is a loose connection or hose defects, the mixer begins to drip after a certain period, and then a leak appears.
The reason the tap leaks is because of wear on the mixer. Typically, the manufacturer sets a certain period of wear, so after a certain period, wear of the threaded elements, gander filter, elements of the locking mechanism occurs. Then elimination of all malfunctions is possible only with a complete replacement of the mixer.

How to fix a crane depending on its type
What to do if a faucet is dripping in the bath how to fix it? It is worth considering all the features of repairing the mixer device. Moreover, repairing a faucet in the bathroom with your own hands is not so difficult. Even someone who does not have experience in plumbing can handle this business. The main thing is to have desire and inventory, materials. Regardless of whether the crane is installed - a single-lever mixer or a double-lever, for a start you need to prepare for repair.


Features of preparation for the repair process:
- First of all, before fixing the current tap, it is necessary to shut off the water supply. Typically, the shutoff valve is located in the toilet,
- while turning the valve you should not twist it too much, otherwise you can disrupt the locking mechanism, then you will have to not only make a leaking single lever tap, but also repair the valve,
- it is necessary to turn the valve slowly, if it has not been used for a long time, then it needs to be developed, but it should be done slowly.
It is definitely worth preparing the equipment for repairing a single lever mixer:
- spare cranes
- a set of keys, which must have a gas key,
- different types of screwdrivers - Phillips, flat,
- it is necessary to purchase new cushioning elements with different diameters,
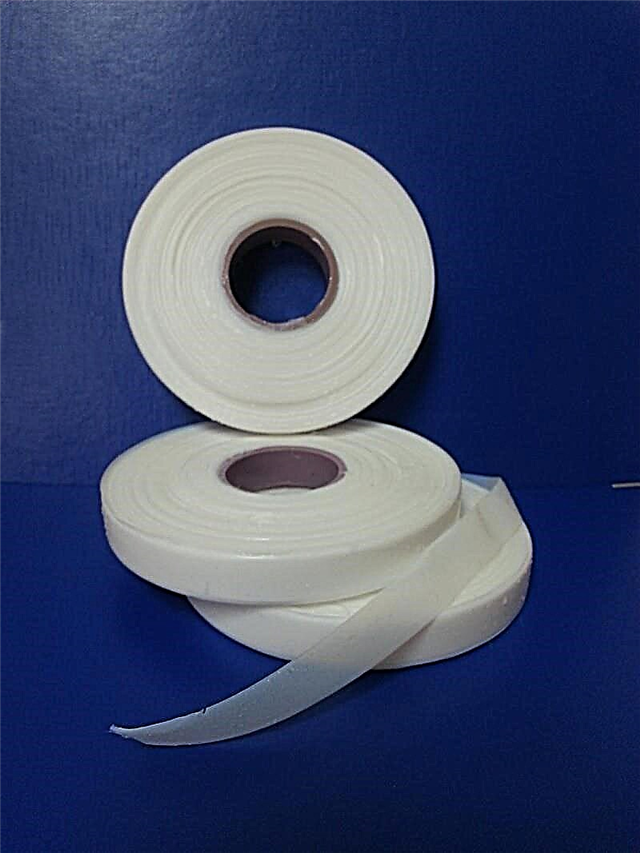
- special tape that is designed to seal threaded elements,
- electric drill,
- seals made of silicone material.

So what if the faucet flows? It is worthwhile to figure out what is the reason, and only then you can fix the faucet in the bathroom.
Gasket replacement
If a faucet is dripping, then it is all about wearing the rubber gasket. The main sign that the crane requires replacing the rubber gasket will be the appearance of leaks from the gander of the mixer.
The rubber gasket element should be replaced as soon as possible, otherwise the flowing water will gradually destroy the inner surface of the housing. If the mixer is not disassembled in time and the old part is not replaced, then gaps will appear on the important components. In these cases, only a complete replacement of the mixer is required.
Gasket Replacement Features:
- The first step is to remove the flywheel from the spindle. Then the core is twisted with an open-end wrench,
- the old cushioning element is usually located at the opposite end of the core and is attached there in the area of a special protrusion. Removing the old gasket element
- from a piece of dense rubber base you need to cut a new sealing element, it is necessary to navigate the shapes of the old worn-out cushioning element,
- the cut-out part must be installed in the original place of the old sealing element,
- the entire assembly is brought together.
If the problem of leakage of a single lever mixer is the wear of the gasket, then you can repair your mixer in a few minutes. But it is important not to tighten, otherwise it can lead to complete wear of the entire mixer.


Stuffing box replacement
If the faucet flows in the bathroom, then the whole thing is possible in the wear of the gland. Typically, a leak is observed when opening the tap. In these cases, a water leak will appear in the area between the gland clamp nut and the valve stem.
If the tap is dripping due to wear of the gland, then how to eliminate the leakage of the tap yourself? You can use the repair scheme:
- a screwdriver unscrews the stuffing box nut,
- the gland can be made independently from the sealing tape,
- the old oil seal, which has become unusable, needs to be removed,
- on the valve you need to wind a sealing tape, which in the future will replace the old oil seal and prevent leakage from the tap,
- it is necessary to tighten the nut in place.
If everything is done correctly, then water leakage after the tap is turned on again will not occur.

Replacing the liner
The cause of the breakdown of the mixer with the axle box is the wear of the rubber gasket. Usually in the mixer it is in the junction between the crane box and the mixer. Most often, the valve leaks due to the fact that the gasket wears out, loses its elasticity or is completely destroyed. The leaking faucet in the bathroom can be repaired quite quickly, the main thing is that you need to carefully follow the instructions.
How to disassemble the faucet in the bathroom and how to repair:
- with a knife or screwdriver, remove the decorative plastic plug, which is used to indicate a cold or hot tap,
- you need to unscrew the screw, which is located under the plug. The screw is loosened with a screwdriver.If the screw does not loosen, then it must be warmed up, for this it should be doused with hot water. After that, the screw can be easily unscrewed with pliers,
- After that, remove the flywheel
- unscrew the nut that secures the mounting of the axle box. We remove the nut from the housing,
- well clean the surface of the stem and sealing elements,
- it is necessary to inspect all the details, they should not be hidden defects, damage,
- then the old liner is removed and a new one is installed in its place,
- the whole structure is assembled.

Gander repair
Sometimes the failure of a single lever mixer can be associated with the wear of the rubber gasket of the gander of the mixer. Then it will be necessary to repair the gander. Over time, the rubber gasket, which is mounted on the gander, wears out and you can observe a strong dripping of water from the tap, and then it can simply continuously flow.
Therefore, if you have a faucet flowing in the bathroom, then this may be due to a malfunction in the laying of the gander. In order to replace the rubber gasket on the gander, you need to unscrew the locking element of the gander - the nut. To unscrew it is worth using an adjustable wrench. After that, the old gasket is removed, and a new one is installed in its place.


Ball Valve Repair
If suddenly a ball valve flows in the bathroom, then it is necessary to use the standard scheme for eliminating the fault. You can fix the problems yourself.
Repair of the ball valve is carried out as follows:
- using a hex screwdriver, slightly unscrew the screw that secures the handle of the crane and remove it,
- after that we will see the stock that is attached to the ball. And also a threaded ring with four recesses,
- then you need to gently push the recess and scroll it counterclockwise,
- then you need to remove the chrome dome with pliers, a ring should remain,
- it is necessary to carefully examine the plastic ring. If it has acquired a creamy color and fuzzy shapes, then maybe the whole thing is in this element and it needs to be replaced with a new one. If there are rust deposits on the plastic ring, they should be removed with detergent,
- after that you need to remove the ball from the socket. This item also needs to be carefully examined, if it has scratches, various defects, it is better to change it,
- Be sure to inspect the tap inside. Usually in the recess there are gaskets with springs, often these elements wear out, the tap begins to drip. It is necessary to remove them and install new gaskets with springs,
- then set the ball in place, while its hole should be located on the right,
- we collect all the other elements.


Single lever
Frequent failures of a single lever mixer include the following problems:
- leakage of the mixer,
- the occurrence of the simultaneous flow of water into the shower net and drain area,
- the presence of a weak pressure of water,
- leakage in the area of the push button switch,
- disturbances in the area of the push button switch.

A single lever mixer may fail for various reasons. Typically, a leak may occur due to a small speck entering the cartridge of the device. In these cases, the mixer is completely disassembled and the cartridge is replaced. In order to repair the mixer, you will need the following inventory:
- Allen key
- pliers
- adjustable wrench
- slotted screwdriver
- sharp knife
- new cartridge.
When all the tools and materials have been prepared, you can begin to repair the mixer. The whole process is performed as follows:
- First of all, with a knife, a plug is made of plastic material, and it is removed. This element is a pointer to the side where you need to turn the lever to open cold or hot water. In addition, this element provides overlapping holes for the placement of the locking screw,
- the screw is loosened and the handle is removed from the control lever. Typically, a single-lever mixer has a screw with a hexagonal hole, so unscrewing it requires the use of an Allen key,
- nuts of a decorative and union type are turned away. These elements hold the cartridge in the saddle,
- after that we take out the old cartridge. On the area of the old cartridge you need to put a new product. The installation is installed so that all the holes of this element completely coincide with the holes on the saddle,
- after that it is necessary to completely assemble the mixer.

Another such unpleasant problem with a single lever mixer is the simultaneous flow of water into the shower area and drainage often due to wear of the rubber elements in the place of the slide switch. This breakdown can only be repaired by completely replacing gaskets and rings. However, it is quite difficult to find rubber rings in the free market; usually, an additional set of these elements comes with the mixer. But if they are not, then they can be cut out of rubber material yourself. But homemade rings will last much less.
The emergence of a weak jet from the tap may be due to clogging of the aerator. In these cases, the aerator mesh is removed, it is blown and washed from all sides. After that, the mesh can be installed back.

The leakage of the mixer in the area of the push-button switch may occur due to wear of the gland. To fix this problem, you just need to remove the old oil seal and install a new one. The oil seal can be purchased at any hardware store.
If the button switch itself does not work, then the cause of this breakdown may be the failure of the spring. This breakdown is eliminated quite simply - the old spring is removed and a new spring is installed in its place.
Dual valve
Damage to dual-valve mixers is usually the same as single-lever devices. Usually fixing problems does not require specialist intervention, because everything can be quickly fixed on your own. The most common failures are usually the following problems:
- oil seal wear
- wear of the rubber pads of the flywheel,
- flow from under the valve
- flow from under the spout nut.
The old oil seal changes according to the following pattern:
- first you need to perform a packing seal, if this does not help, then it will require a complete replacement,
- to replace this sealing element, unscrew the union nut and remove the stuffing box sleeve,
- then the old oil seal is removed,
- it is necessary to perform a high-quality seal; for this, a tap rod winding
- an oil seal is installed,
- after that it is necessary to replace the sleeve and tighten the union nut.
How to replace the old rubber gasket:
- first you need to shut off the water and remove the casing, mounted on a bolt and held on a thread,
- the neck is removed with a wrench
- at the bottom of the neck is an old rubber gasket, replaced by a new element,
- after that the mixer is assembled in the reverse order.

Leakage from under the valve may occur due to a pin that has flown out of the stem. This problem may occur due to the fact that the pin was not initially installed tightly or because the sealing tape wound around it was worn and worn out. In this case, the water is shut off, the flywheel is removed from the valve head and the dropped stem is removed. Next, a sealing tape is wound and a pin is put in place.
Water leakage from under the spout nut may occur due to wear of the rubber gasket. In this case, you need to remove the spout nut, remove the old gasket and replace with a new one. Mono new gasket cut yourself from rubber material.
If a leak appeared from the tap, then it must be disassembled and inspected. A dripping mixer is the first sign that the device of this element is in need of repair. Do not start this process, otherwise you will have to completely change the mixer. Therefore, if you have a drip tap, immediately proceed with troubleshooting.
Leak repair
First of all, you need to calm down, because if you call a locksmith, he can cope with this task, which means that it is possible for others. On the other hand, do not close your eyes to this, because the flow will only intensify. Dripping water is, of course, annoying, but this is not the main problem.
Even a small drip per year can turn into hundreds of liters. Due to the wet environment, corrosion of the metal is formed, and this leads to rusty smudges. Few people like to look at the red spots spreading over the sink or bath.
 However, the aesthetic appearance is not the main thing. Rust corrodes metal over time, making it "weak." Over time, a leak may occur in this place, or in the worst case, a pipe break. The consequences include the “boiling” of threaded joints, when it will be difficult or even impossible to untwist them. This will again lead to unnecessary costs. Therefore, the leak must be eliminated as soon as it appears.
The elimination of any malfunction begins with an analysis. It is necessary to identify the problem and only then solve it, for this a visual inspection is performed. Leak may occur for the following reasons:
 Skips the tap.
- Loose stuffing box packing.
- Depressurization of the shower hose or pipe.
 Skips the tap.
In practice, this is done as follows. If, with closed taps, water runs out of the shower head or spout, water is dripping, this indicates that the tap valve is allowing water to pass through. Another thing is when water runs or drips from the mixer or tap itself. It can be connected with an epiploon or a hose, a tube. To determine the cause, it is necessary to identify the exact place of water leakage. If it comes out slowly, the leakage site is wiped dry and watch where it seeps.
Design definition
The most common nuisance is that a faucet has leaked in the bathroom. In this case, it is necessary to clarify with what design the malfunction is associated. Different models use certain methods to eliminate leaks.
By the type of shutter used, cranes are:

- locking
- conical
- ball.
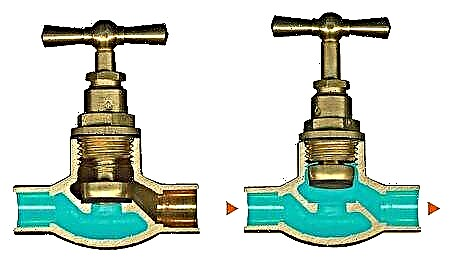
In their use, stopcocks have become rare enough, however, they can still be seen. The main difference from other models is that to close or open the valve, it is necessary to make several revolutions of the valve. The saddle is a round hole in the body of the crane, it connects the inlet and outlet nozzles. The valve, or plug, is made of metal or non-metal, sealed with a rubber gasket. There is a thread in the valve body and on the stem, the body acts as a nut, and the stem acts as a screw. When the stem rotates with a valve, the valve closes the seat or opens it.
So that there is no leakage of the valve through the stem, an stuffing box is made of sealing material. Locksmith call it stuffing. These are oily or dry fibers woven into ropes of different diameters.
The packing is wound on the rod, gradually pushing it between the rod and the body until it stops passing. After this, the packing is cut off. For sealing use a special sleeve. It is put on the rod over the packing and pressed against the nut. Then the valve is put on and fixed with a nut or stopper.
In this design, the oil seal most often begins to leak. This is evident when water runs out from under the valve. It can appear during opening / closing or in the open position when the valve is open and there is water in the body.
Repair tap
This design has a good feature, if the crane starts to leak through the gland, you may not need repairs. When the packing is packed in sufficient quantity, the clamping sleeve does not fully enter the body, this makes it possible, without disassembling the entire structure, to eliminate the leak. To do this, just tighten the clamping nut.
 Initially, the stem is extended to a position where water begins to run through the gland. Then they begin to turn the clamping nut a little clockwise (twisting it) until the flow stops. This can be done with a wrench, and sometimes by hand. The clamping nut is located directly under the valve. It looks like a cork from a plastic bottle, but in the middle has a hole for the stem. Sometimes the packing hardens or the clamping nut is already tightened, in this case you have to resort to disassembly. But first you need to purchase this very stuffing.
Repair begins with the removal of the valve. Some modern valves have a decorative plug. It also prevents splashing water on the connector. This helps protect the threaded joint from rust. You can remove the plug with a knife or a sharp screwdriver. To do this, she is pulled and pulled. Then release the valve by unscrewing the bolt, nut or removing the stopper. The stopper looks like a cut washer with cutouts. A thin screwdriver, carnation or needle can be inserted into these cutouts and, having pressed on the stem, pull out the lock washer.
Then it is necessary to unscrew the clamping nut with a key. There is a sleeve under this nut. Pry and pull it out with a sharp screwdriver. A new packing is inserted into the formed cavity, each ring is rammed until the packing fills the entire area, after which it is cut off. The sleeve and retaining nut are put in place. The valve is put on the stem, but does not stop.
The rod is twisted to a position in which water previously ran. If water continues to flow, tighten the clamping nut. After eliminating the leak, the valve is opened and closed several times to check operation. If everything works fine, stop the valve and put a decorative plug.
Packing Replacement
It happens that the measures taken do not eliminate the problem, the omentum continues to run. In this case, you will have to turn off the water, but if the tap is located nearby and you can quickly turn it off, then do not rush, let it stay open for now. Again, remove the valve holding the nut and sleeve. Then remove the new packing, and then the old. Here the pressure of water will help to cope with this task. Now the water can be shut off. The packing is rewound and tamped, a sleeve and a clamping nut are placed.
 Over time, the oil seal can become so coarse that it can not be removed in this way. In this case, a complete disassembly is required. After removing the valve, the pressure plate and sleeve unscrew the axle box. Its nut is located on the body under the pressure. Then the rod is screwed until it comes out of the body. From the side of the inner chamber with an awl or other sharp object, the stuffing box is pushed out.
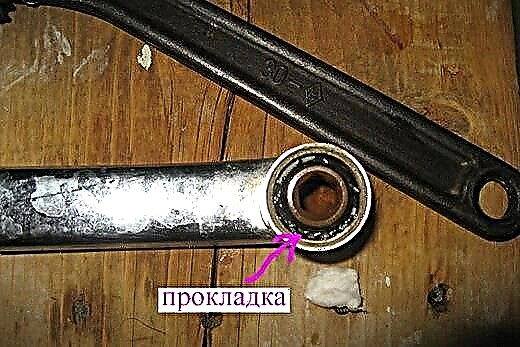
At the same time, it is possible to audit the spool (valve) for its integrity, as well as the saddle so that there is no debris on it. The gasket between the axle box and the body is checked. If it is damaged, you will need to cut a new one. For this, rubber, thin felt or the same packing is suitable. The packing is wound clockwise upwards.
The assembly process is in the reverse order: the stem is inserted and screwed in, the axle box is twisted, the stuffing material is pressed in, the sleeve is put in and the retaining nut is twisted. As a rule, a new stuffing material is immediately compressed under the sleeve, so you will need to rewind it. After that, the clamping nut, valve, stopper and plug are put in again, water can be opened.
Repair work

Single lever mixer circuit.
What should be done if the taps flow or they simply do not have water? There can be several sources of problems:
- water drips even when the tap is closed,
- water trickles out when the valve is completely closed, while over time it only increases,
- water with an open valve simply does not flow through the tap,
- moisture seeps through visible damage to the equipment.
Once the source of the problem is identified, it is necessary to shut off the water. It is recommended to immediately shut off not only cold, but also hot water, since you will have to remove the mixer. After that, the equipment is carefully disassembled so that repair work can be performed.
For example, if the water just starts to leak, then the reason is the loose fit of the axle box or the complete wear of the rubber gasket. Laying is very simple, it takes just a couple of minutes, including disassembling and assembling the crane. In a ceramic faucet you will have to seal the silicone gland, for the rest of the models, make a complete replacement.
If water flows in a trickle, then also replacement of the axle box is required, in which the edges are simply worn out. But this problem is often caused by the fact that the mixer is not operating properly. It is impossible to tighten the valve when closing too tight, this will quickly erase the edges, and repair is required quite often. If severe damage in the form of cracks is visible on the mixer, then it simply needs to be replaced. Repair in this case will be a simple waste of time and money, water will flow. If only the valve is damaged, then it can still be replaced, but it’s better to immediately buy a new case.
If water from the tap simply does not flow, but flows to the mixer, then the reason may lie in a broken faucet-box or gasket, which is bent and does not allow water to fall into the spout. This problem is solved depending on the breakdown. If the gasket is bent, then you just need to remove it and replace it with a new one. If the crane box is broken, then it must be carefully dismantled, put in working order, check the operation of the crane.
In rare cases, a complete crane replacement is required. Usually this happens if it is completely out of order, it can no longer be repaired. Specialists advise to replace if the equipment is old, leaks and other problems are often observed. It is necessary to choose taps and mixers that are most suitable for specific conditions. Today, manufacturers offer the widest range, so there should not be any problems with the choice.
When the water does not flow well from the installed tap or it simply does not exist, you need to figure out what caused this malfunction. After this, you can start the corresponding repair, the complexity of which depends on the scale of the breakdown. In rare cases, a complete replacement of the valve may be required, but usually it does not come to that.
The main causes of leakage of cranes
Failures leading to the drip mixer are different, but the main ones are as follows:
- Wear of the rubbing parts of the mixer: gaskets or gland.
- Deterioration of a locking element: crane boxes or cartridge.
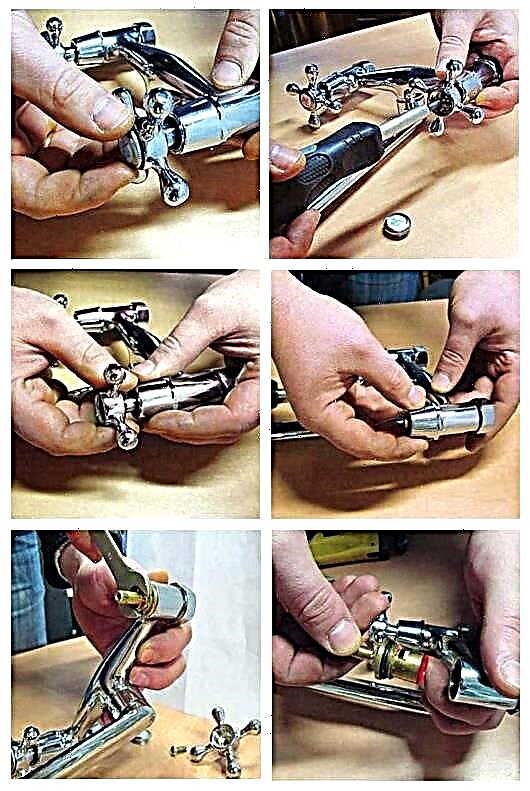
The method and technology of repair depends not only on the place where the mixer is leaking, but also on its type. According to the type of construction, the cranes are two-valve and single-lever. The latter are also divided into cartridge or ball models.

Repair of ball mixers
If a ball mixer is installed and flowing in the bathroom, it can be repaired. The function of the locking mechanism is performed by a small ball made of stainless alloys. When turning the control lever, the locking ball moves in the mixer body and opens or closes the holes for supplying cold and hot water. To keep the locking ball in neutral, springs made of corrosion-resistant metals are used.

Ball valves are very reliable and durable in terms of leaks.To disassemble the ball mixer in case of leak detection, the following steps must be performed:
- The lever is removed. To do this, a decorative plug is pry off and the screw located underneath is loosened.
- Unscrew the cover of the tap.
- A nut is located under the cover, which also needs to be unscrewed.
- Having unscrewed the nut, the cam washer is carefully removed from the housing - a plastic seal that holds the locking ball. If the washer has worn out, it must be replaced.
- The next step is to remove the locking ball from the housing. It is cleaned of rust and plaque with a soft cloth and inspected to determine the degree of wear. If the production of the ball is insignificant, the ball is polished with a soft cloth using cleaning products in the form of an aerosol or paste (it is forbidden to use abrasives), after which the valve is assembled. If the locking ball has damage, deep sinks or openings, it should be replaced.
Note! When assembling the ball valve, it is necessary to correctly install the springs in the special recesses intended for this.
Replacing half-turn axlebox
Breakage of half-turn axleboxes is the main reason why the faucet is dripping in the bathroom. These mechanisms are similar in design to single lever cartridges: inside them there are tightly fitted ceramic plates that act as gate valves and block water. When these plates are developed or damaged, the faucet ceases to hold, may begin to drip, and then water will flow with a stream. Most often, semi-reverse mechanisms change completely. Consider the algorithm of actions:
- The decorative cap is removed from the valve. In some models, it can be hooked with a thin screwdriver, and in some it can be threaded and twisted.
- There is a fixing screw under the plug - it must be completely unscrewed. Care must be taken here, as these screws often turn sour or rust, so you can easily lick the screw head.
- When the valve handle is removed, using a suitable wrench, the crane axle is unscrewed.
- After this, a new axle box is screwed in and a handle is installed.

Advice! When assembling the crane, the axle box should not be tightened too much, since it will be difficult to unscrew it during the next replacement.
Repair of valve box
A valve or wing valve controls the water supply by moving the extension rod with a rubber gasket at the end by means of a worm gear. If this gasket is worn, the faucet stops holding water and begins to flow in a closed state. The advantage of valve boxes is its maintainability. The gasket is replaced in the following order:
- The valve handle is removed.
- The key is unscrewed crane box.
- The gasket is removed from the underside of the axle box and a new consumable is installed.
If a leak occurs between the clamping nut and the valve stem, the worn packing must be replaced. With the axle box removed, the valve mechanism shaft is unscrewed and the stuffing box is replaced - a thin elastic band (sometimes double) inserted into the groove of the rod. If there is no new stuffing box, then a sealing tape can be wound around the stem, which will act as a stuffing box and prevent leakage when opening the valve.
 Gasket replacement scheme.
Malfunction or leakage of the switch from the gander to the shower
Bathroom faucets have a switch that allows you to redirect the flow of water from the gander to the flexible shower hose and vice versa. The most common failure of these switches is that water flows simultaneously from the gander and from the shower. Most often, there are two types of switches:
- Flag or pendulum type. Mounted on valve mixers.
 The mixer with the flag switch type. Push-button or exhaust type. Most often installed in the body of cartridge valves, but can also be mounted on valve devices.
 Button type switch.
Consider how to repair these types of switches.
Replacing the pendulum switch
The rotary switch is a brass spool or cartridge, which is replaced with a new one similar to a crane-axle box:
- The decorative cap on the lever is revealed, opening access to the screw.
- The screw is unscrewed, the lever is removed.
- A key of a suitable diameter is used to unscrew the switch.
- A new spool is screwed in, a lever is put on and fixed.

Button Switch Repair
In this design, the most vulnerable element is the gasket, which is subject to wear, deformation and hardening, because of which it ceases to hold water. If the button stops redirecting the water flow, it is necessary to replace the gasket, which is done in the following sequence:
- The adjustable wrench unscrews the button. It must be removed from the housing carefully so as not to damage other structural elements.
- Rubber washers-seals are placed on a metal rod - they need to be replaced with new ones.
- After changing the gaskets, the button is inserted into the housing and twisted.

Note! Another breakdown of the push-button switch is jamming in a raised (upper) state, as a result of which water flows only through a shower. Such a malfunction means that the spring has returned to disrepair, returning the rod to its original position. This part cannot be replaced, so the switch changes completely.
Leak at the jib to the mixer body
One of the common places for leaks is the connection of the gander and mixer. Such a connection is sealed with a ring of dense rubber, which is worn on the body of the gander. When turning the gander, the gasket gradually wears out and a leak forms. To fix this malfunction, the gander ring gasket must be replaced. This is done in this order:
- The gander nut is unscrewed with an adjustable wrench or Swedes.
 To replace the gasket on the gander, unscrew the mounting nut.

Advice! In order for the gander with the new O-ring to easily enter the mixer body, the ring must be lightly greased with silicone grease or sealant, which will ensure easy sliding.
Leaking at the connection point of the shower hose and watering can
Even during the operation of the mixer, leaks often form at the points of connection of the flexible hose to the mixer and shower head. In these places, gaskets are installed that, over time, deform and sink. In case of leakage, disconnect the hose and replace the gaskets.
The hose is connected to the mixer using a turn-key hex nut. It must be unscrewed and the gasket changed.
 To replace the gasket at the connection point of the shower hose to the mixer, a key is required.
The connection of the hose and shower head is carried out using a conical embossed nut, which can be unscrewed without a tool and even a girl can do it. A gasket is located on the pressure hose and needs to be replaced with a new one.

Note! The hexagonal and taper nuts for connecting the shower hose are very thin, so when tightening them you should not put a lot of effort, as they can burst.
Leakage at the junction of the inlet pipes
The cause of the leak at the point of connection of the wall mixer at the points of connection to the branch pipes exiting the wall is the sticking or skewing of the gasket. To eliminate this malfunction, unscrew the fixing nuts, disconnect the mixer and replace the gaskets with new ones.

Leaking flexible hoses
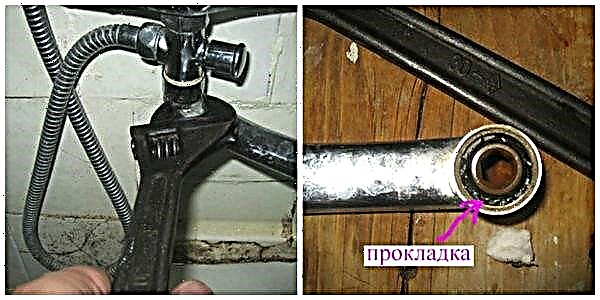
Faucets mounted on the side of the bathroom or sink are connected to the water supply using flexible hoses.Leakage at the junction is the result of wear or grinding of the seals worn on the thinned end of the hose.
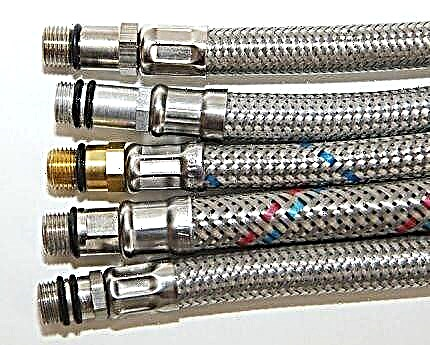 O-rings on the thin end of the hose may wear out, resulting in leakage.
To replace the rings, it is necessary to remove the tap from the sink, since it is difficult and sometimes impossible to do this from the bottom of the plumbing device. Having removed the mixer, the hoses are unscrewed in turn with a wrench, rubber rings are replaced with them, after which all elements are replaced.
 To replace the O-rings on the flexible hose, the mixer must be removed.
If the water pressure drops
There are situations when in one of the taps the water pressure is significantly reduced. The cause of this malfunction is an aerator clogged with scale and other debris - a strainer screwed into the end of the gander. To eliminate this problem, it is enough to unscrew the aerator, rinse with water and clean the filter mesh with a needle or thin awl, and then screw it into place.
 A clogged strainer is the reason for the decrease in water pressure.
The considered malfunctions and methods for eliminating various leaks will make it possible to repair cranes with their own hands without calling a plumber. As practice shows, many types of leaks and breakdowns can be avoided if you take care of plumbing. The quality of the mixers and the degree of mechanical purification of water also play an important role, so the installation of coarse and fine filters is sometimes simply necessary.
Advice! If you need a master to repair the bathroom, there is a very convenient service for the selection of specialists from PROFI.RU. Just fill out the details of the order, the wizard will respond and you can choose who to collaborate with. Each specialist in the system has a rating, reviews and examples of work that will help with the choice. It looks like a mini tender. Placing an application is FREE and does not oblige you to anything. It works in almost all cities of Russia.
If you are a master, then follow this link, register in the system and be able to accept orders.
If water drips from the valve
Most likely, rubber pads were worn out at the tap in the kitchen. Or the crane is loose. It is necessary to carefully inspect the tap, check the tightness of the fit of the tap to the mixer. If the axlebox crane is ceramic, then most likely the silicone gland is loose. It must be condensed.
If everything is in order with the fit, then you just need to change the rubber gaskets. New ones can be purchased at the store. Disassemble the crane, remove the old destroyed gaskets, put new ones and reassemble the crane.
If water drips from the spout
This suggests that the box faucet in the kitchen has worn off and its edges no longer shut off the water supply from the water supply. Most often, such a breakdown occurs with cheap cranes. To fix a faucet in the kitchen in this case is also very simple: you need to purchase a new faucet for the axle box and replace it with the old one. Replacing the valve will also help. If the leak does not stop, you will have to replace the entire mixer.
 Do-it-yourself crane repair will save you a lot of money
What to do if water drips between the faucet and the spout
The gaskets may have worn out or the spout has unwound. Turn on the tap and check the condition of the gaskets. If they collapse, then it is worth replacing them. Perhaps this defect leads to the fact that the crane was installed incorrectly and the crane was tightened too much. Because of this, damage to the gaskets has occurred. In this case, repairing the tap is simple - replacing the gaskets. Sometimes the gaskets are in order, which means that bad hoses are used. They need to be replaced.
Leakage between faucet and sink
The faucet is loose or loose during service. Simply twist it so that water does not drip in the kitchen. Another cause of leakage is the wear of the gasket between the sink and the mixer.It is necessary to eliminate the cause of the leak - replace the gaskets and, for reliability, cover the place between the sink and the mixer with silicone sealant.
If the faucet is damaged: do not repair it, as this is pointless. It is better to purchase a new crane and install it in accordance with all the rules.
How to repair the faucet in the bathroom with shower?
Failures of mixers contribute to a lot of reasons related to poor-quality materials, improper installation and many other factors.
To eliminate the causes of the breakdown, you should call the wizard or you can try to do it yourself.

Reasons and procedure for eliminating leaks in a single lever tap
To repair a single lever mixer with your own hands, you need to establish the causes of its breakdown. There may be many, consider the main ones:
- mechanical damage caused by breakage of the case or the formation of cracks on it,
- formation of a gap on saddles and a ball,
- gasket production
- aerator malfunction due to rusting of the material,
- clearance on the aerator.
If the problem arose due to a breakdown of the case, it is worth using a waterproof sealant or cold welding. The necessary parts are wiped with a rag, damaged places are carefully lubricated. However, such repairs will not last long, and soon the case will have to be replaced completely.
With a low pressure of water, it is necessary to remove the aerator and brush it and the mesh with a brush. The bell through which fluid flows can also be contaminated.

If the faucet is flowing, but the cause of the malfunction cannot be determined from the outside, then you need to completely disassemble the entire mechanism and look for the cause thoroughly, checking each part separately:
- First, the water supply is shut off, then the plug is removed with a screwdriver.
- Next, you need to unscrew the screw that holds the decorative cap.
- Then the cartridge is pulled out - for this, the nut is unscrewed with a wrench. All details are worth checking for defects in them. If none are found, move on.
- Having removed the tap completely, we look at the gasket, springs, ball and rubber seal. The developed parts should be replaced with new ones. The remaining ones are wiped with a rag from accumulated sediments and deposits.
One of the most common problems is getting debris under the ball and valve seats. In this case, you have to change the entire cartridge.
Reasons and procedure for eliminating leaks in a two-valve mixer
The main reason for the breakdown of such cranes is their quality. Can also pass glands on the crane box or gasket. These parts can be replaced.
Step-by-step instructions for parsing a two-valve mixer:
- shut off the water supply,
- traffic jam removal
- unscrewing the fixing screws,
- lifting the axlebox using a wrench.
It is best to remove the plugs with a thin screwdriver so as not to spoil them.
Screws need to be unscrewed carefully, as they are most often oxidized, and it is difficult to unscrew them. You can use WD-40 or a few drops of acetic acid.
The axle box crank is unscrewed from the body with a wrench counterclockwise. It is pulled out by fingers. For repair, it is necessary to look at the saddle in the housing so that there are no cracks on it. Then on the crane box the stuffing box and gaskets are changed. The assembled mechanism must be rubbed with silicone-based lubricant, and then assemble everything in the reverse order. Next, you need to install the crane box and clamp it with a key. Do not tighten the mechanism strongly so as not to disrupt the threads in the housing. If you break it, you will need to completely change the entire mixer.
Shower Switch Repair
There are several types of shower switches, consider a few of them.
Leaks in such switches come from under the handle, which opens and closes the water supply.
- the rubber rings on the rotary stem have worked or not,
- wear on the axle box,
- unscrewed axle box.
After correcting or replacing parts, the switch must be assembled and checked.Do not forget about the lubrication of the switching mechanism.

To disassemble this mechanism, you need to turn off the tap, remove the cap, unscrew the screw and pull out the button with the spring.
- the spring sags and does not hold,
- worn valve rings.
If the spring has slipped, it is worth replacing it with a new one or making it yourself. To do this, it is stretched and heated red-hot, after which it is lowered into cold water. After cooling, it is necessary to heat again for uniform hardening. You can also make a spring from a wire in the same way.
If valve rings become brittle, replace them. After replacement, the entire mechanism should be lubricated with petroleum jelly or other lubricant.

The main malfunction - the cork does not adhere well to the body and is leaking. It may also be:
- poor abrasion
- erosion of the mechanism
- the presence of solid particles in the housing.
In order to fix such a switch, it is necessary to unscrew the screw, remove the handle, unscrew the nut and remove the snap ring. After a thorough inspection, lubricate the parts with Vaseline and reassemble.
Fixing a single lever mixer model
In a single-lever type crane model, the cartridge is considered an element that regulates operation. Cartridge mechanism is usually collapsible.
The crane repair scheme is typical, but sometimes it differs depending on the brand of the mixer. Common  The mechanism for all devices is considered the nut, which fixes the cartridge and is held by a functional lever. The decorative overlay of the case covers the fasteners. The overlay is faked with a screwdriver, a cartridge is removed and a new one is installed. When leaking at the junction of the mixer with the sink, it is necessary to replace the seal ring that is inserted between them. Remove the case and replace the old ring. Instructions for the use of any type of crane will allow for repair work, observing the nuances of individual manufacturers.
Ball Repair
Locking mechanisms with a spherical device occupy the second place in consumption in the economy, because they are considered durable, easy to use. Elements are made of their very durable material.
Repair Instructions for Ball Valve:
- Loosen the screw holding the handle.
- Remove the handle from the shaft.
- Using a screwdriver, remove the threaded screw.
- Remove the plastic seal and cover.
- Clean gasket from dirt deposits, if necessary replace with a new one.
- Remove the locking part in the form of a ball, inspect it, if there is strong wear, replace the device.
- Replace ball seals by removing them with a thin screwdriver or tweezers.
During assembly of the device, coat all connections with sealant.
Attention! If the ball mechanism breaks down, it is worth making a replacement for a new one, since the device requires accurate assembly, which is difficult for an amateur to perform. https://www.youtube.com/embed/iexceEF7U9U
How to replace a gasket for a seal
A common cause of malfunction is a worn gasket to seal the joints. In this case, the seals require replacement. Most often, the gasket must be changed on the axle box, which serves as a lock, also at the junction of the spout with the sink. To work, you must have a plumbing wrench and gaskets.
How to make the replacement in the axle box of a two-valve device:
- Remove the plug from the plastic, unscrew the screw with a Phillips screwdriver securing the rotary flywheel.
- Unscrew axle box with adjustable wrench.
- Install a new gasket on the sink body and axle box valve, not forgetting to lubricate the seals with sealant.
When installing the seal in the casting mechanism, care must be taken not to damage the locking head. It is necessary to put on a turn-key basis material for isolation of an adjustable wrench, for example, insulating tape or paper
Having removed the tide, the gaskets are replaced.
Repair and replacement of a gander
Replacing a gander in a two-valve crane occurs in a standard way, the old one is unscrewed and a new element is installed. In the single-lever version, the gander is installed in the housing, so it is impossible to remove it - you need to completely replace the mixer or repair the current tide.
To close cracks and cracks in the body of a damaged tide, cold welding, epoxy and other building materials are used.
Since the tides are made of metal (copper alloys, brass), which can be easily brazed, the most high-quality and effective way to restore them is sealing. Before carrying out the work, remove the top layer of the chrome coating with sandpaper and seal the cracks in the gander tube with a high-power soldering iron.
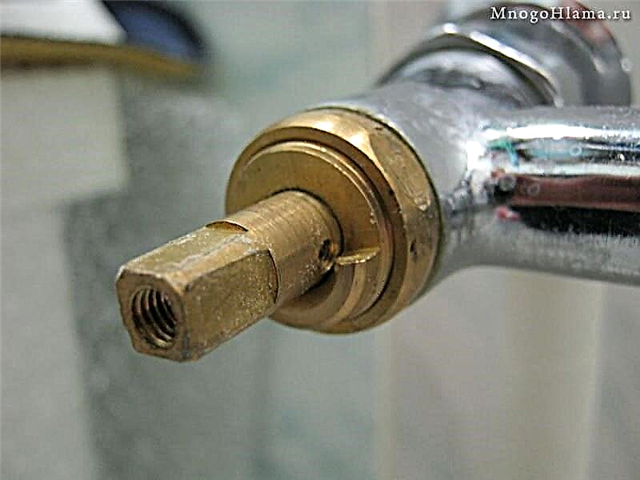
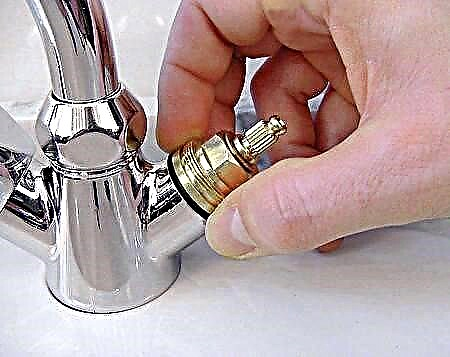
How do I replace the box with my own hands?
Each modern mixer has a faucet-box, necessary to shut off the flow of water. Depending on the device, it can be ceramic or with a rubber gasket. When, when the water was turned on, noise, whistling and rattling began to sound, it was necessary to remove the box, assess its condition, and then replace or clean it.

To extract this element from the mixer, you must follow the following algorithm:
- First, it is necessary to shut off the water supply to the apartment using ball valves, so that during operation there is no tearing of the valves or leaks.
- The next stage of dismantling is the unscrewing of the protective cap from the “lamb”, that is, the handle, the rotation of which controls the water pressure.
- After removing the protective cap using a Phillips screwdriver of the required size, unscrew the support screw.
- When the support screw is removed, the box is unscrewed from the mixer with a plumbing wrench.
If a box with a gasket is removed from the mixer, it is necessary to evaluate the degree of its wear. It is very simple to do this: if the rubber has become hard and does not bend, is “numb”, then the gasket has become unusable, it must be replaced with a new one. If the rubber remains elastic and resilient, then to eliminate noise in the crane, you need to carefully trim its edges at an angle of 45 degrees.
Metal ceramics containers rarely break, as they are made of materials not subject to deformation. In addition, the principle of their operation is based on the precise fit of the parts of the locking mechanism. If, however, a breakdown does occur, then the reason is the silicone gasket between the ceramic plates.
To eliminate the problem of noise from the crane in this situation, you need to replace the ceramic box with a new one. To do this, the easiest way is to first unscrew the failed one, run with it to the store to purchase a similar one, and then assemble the mixer in the reverse order, not forgetting the fum tape.
Why is leaking new crane axle box
Recently I replaced a couple of cranbuks in the bathroom and ran into a problem such as digging up cold water from my beak. How many times already changed them and everything was always wonderful, but this time, water ran from the new axle boxes. Interestingly, water leaks as it does not constantly, then flows, then no. I noticed only one peculiarity, as soon as I tried to tighten the lamb tightly, that is, to close the tap as much as possible (almost to the bend of the locking screw on the rod), so the water began to drip even harder. After that, for some reason, the idea came to my mind that when the lamb is rotated, the movable plate of the crankbox begins to move to the open position, that is, it goes into the second half-turn.


To check this, I decided to remove the lamb (crane handle), unscrew the locking screw from the side of the stem and continue to move the stem to the closed position without the screw. It was enough to turn the stem 2-3 mm and the water from the spout ran already by stream. In general, I think all this is due to the fact that the edges of the holes in the ceramic plates in the closed position are close to each other, that is, the movable plate practically goes into the open position, since it is this screw that limits it from 360 degrees rotation.

These are old ceramic liners, so to speak for clarity. These two crescent openings are clearly visible here, the combination of which leads to the opening of water in the mixer.
Here I sketched a small sketch (photo below) which makes it easier to understand why (it seems to me) water is leaking.In the upper figure, the cross section of the crane box in which the holes are evenly spaced and water does not flow. In the bottom figure, the hole of the movable plate has stopped too close to the hole of the fixed plate. Perhaps because of this, water leaks, since the contact area of the ground plates between the holes is very small.
All these are my speculations, perhaps this pair of ceramic plates is only poorly polished or has an invisible scratch on the mirror, somewhere near the edge of one of the plates. But I didn’t really want to disassemble the axle box to replace the ground pair or gum.
Therefore, I decided to first play around with the position of the rod, if it does not help, then later I will sort through the entire crane box. To begin with, I decided to put the locking screw back in place, move the stem to the closed position, and then turn the stem by 2-3 mm to the open position, that is, close the valve, but not completely. After this maneuver, the water completely stopped digging up, even leaving it for the night, for fidelity.

To limit the rotation of the rod to the closed position, I decided to replace the standard locking screws with others.
It was possible to find brass, with a hat, this hat will limit the stem rotation by the same 2-3 mm. I think it is possible to wrap steel ones too, but then before putting on a lamb, it is better to grease them abundantly with grease so that they do not rot very quickly. Or use instead of new screws with a hat, some fragments of tubes, putting them on or gluing them to the factory screws.

Here the truth may be another problem. The hat can rest against the body of the crane, in the photo below it is clearly visible, longitudinal scratches appeared.
Fix rotary valve breakdowns
Before you start the story about how to troubleshoot valves, you will have to stop the water supply to the apartment, and therefore, turn off the main tap.
Additionally you will need:
- slotted screwdriver,
- Phillips screwdriver,
- a set of keys (you will definitely need 12 * 14),
- adjustable wrench
- fum tape - fluoroplastic sealing material,
- spare parts of the mixer (gaskets, crane box).
As a rule, specialists distinguish between two types of faults:
1. Water constantly drips or runs out of the gander, therefore, the valve does not hold water. The reason lies in the seal on the crane box.
To fix the breakage, you will need spare gaskets. In general, the house always needs to have replaceable rubber (plastic) gaskets. You can buy them at a specialty store or in the market. But remember that good rubber pads should not be too hard. They must be flexible, otherwise the rubber will quickly become unusable and you will have to repair the mixer again.
This is especially true for half-turn valves with ceramic discs. If they fail, they must not be repaired, but only replaced.

If you have water flowing from the faucet in the bathroom, then you need to do this:
- carefully remove the decorative plug with a straight screwdriver,
- then use a Phillips screwdriver to loosen the fixing screw so that you can remove the valve handle,
- using an adjustable wrench, unscrew the nickel barrel - in order not to spoil the nickel coating, wrap it with a cloth and only then use the key,
- Now it’s the turn to unscrew the axle box,
- if the sealing gasket fails, then you will have to replace it with a new one,
- but if the crane box itself is the cause of the mixer’s malfunction, then you’ll have to install another one in its place,
- when reinstalling the crane axle box, you will definitely have to wind 3-5 layers of fum tape on its thread, which will preserve the tightness of the parts in the mixer.
Turn on the water and check that you have completely eliminated the problem.
If your water is leaking slightly from a swirling faucet, gently squeeze it using an adjustable wrench.But try not to overdo it too much with either the clip or the fum tape
If you change the crane box, then before buying a new part, take the faulty one with you, so that the seller can pick you the identical one. Otherwise, you will ensure yourself a second trip to the store, because you bought almost the same crane box as yours.


2. The second type of malfunction, if you have water flowing directly from under the valve. Then you have to remove the mixer handle to determine the place from which the water comes. If water oozes directly from under the thread, then you unscrew the crane box, remove the old fum tape, apply a couple of new layers to the thread and install the part in its original place.
If water enters through the stem of the axlebox, you will have to unscrew the clamping nut, remove the old seal and put in a new one (wind a layer of slightly soaked linen cloth). This is especially common in older valve models.
Consider the reasons why it can drip from the mixer in the kitchen
There may be several reasons for the formation of leaks:
- Improper use. Any equipment has certain operational characteristics. Providing a guarantee for their products, each manufacturer stipulates it with a number of restrictions, violation of which leads to accelerated wear and damage. And often to execute them or to control the specified parameters is almost impossible.
- Poor workmanship or poor quality materials. Often, making a certain purchase, a person tries to choose an inexpensive product, trying to use financial resources economically. But often this results in not just inconvenience, but a direct loss of money in the event of a forced replacement of defective goods. Especially unpleasant are cases when the breakdown occurs in the absence of people. When purchasing a faucet for your apartment, it is better to pay for the brand, because this concept also includes such an indicator as product quality. However, the low cost of a popular brand should alert - most likely, this is a low-quality fake.
- Natural wear associated with long-term use. Cranes open and close multiple times during the day, its locking parts (gaskets, axle boxes, cartridges) work intensively and quickly wear out. Therefore, the best way to avoid leaks is the timely forced replacement of quickly wearing parts.
- One of the reasons for the breakdown may be poor build quality. The most typical errors are misalignment of parts, destruction of seals due to too tight tightening. Factory rejects cannot be ruled out, so a thorough inspection upon purchase is required.
How to determine the cause of leaks?
To find out exactly what problem has already arisen and why the tap is dripping, consider the sources of leakage in the following places:
- Leak appeared at the bottom of the tap body attached to the sink or valve.
- Water begins to drip or flows in a thin stream from the gander with the valve closed.
- Moisture seeps at the junction of the body and spout.
- Water does not flow or has a low pressure with the valve open.
- A leaking kitchen sink faucet has noticeable damage through which fluid leaks.
- Leakage is at the bottom of the connection point with the supply hoses or pipes.
To eliminate problems with a leaking or dripping tap, it is not necessary to change it, most of the malfunctions can be eliminated with your own hands.
Standard dual-valve kitchen faucets
If the water flow has become too weak
The main reasons for the low flow during proper operation of the mixer are clogging of the filter aerator, damage to the cartridge or shut-off valve, and abrasion of gaskets. In the first case, the aerator filter is unscrewed from the spout, cleaned with a brush and washed, parts must be replaced to eliminate other malfunctions.
Leaking under the sink
If a kitchen faucet under the sink is found to leak, the water inlet hose may have leaked due to damage or the gasket has worn out at the point where it was connected to the body.
In this case, you can run to the store for a new hose or gaskets. Repair consists in replacing the entire hose or O-rings in its outlet at the connection point.
Leak at the junction point
When the kitchen faucet flows at the junction of the spout with the body, gaskets are damaged at the base that flows through it or they are badly worn. To eliminate the malfunction, you should purchase new rubber gaskets and replace the old worn rubber rings with a new seal.
Flowing gander
The mixer spout can leak if its housing is damaged, the main reason for such a defect is a clogged filter at its outlet, as a result of which the water pressure leads to cracks in the metal tube. If a malfunction is detected in single-lever models with a non-separable ebb built-in in the housing, you will have to completely change the mixer except for the cartridge. In a double-valve design, the gander can be easily removed and replaced with a new one.
Other causes of water leaks
Sometimes the mixer starts to work poorly after a while without special reasons, while it is not immediately clear what to do if the tap is dripping. The main reason for such a malfunction is the formation of a precipitate of lime salts on plumbing parts.
In this case, you need to disassemble and clean the faucet using special household chemicals to clean sanitary equipment from limescale.
Other faults
If it turns out that the tap itself is leaking, you need to completely disassemble it to get to the saddle with a spool. Most often the gasket on the spool breaks. To replace it, unscrew the stem. After that, the spool is clamped with pliers or, if possible, use a vise. Unscrew the nut with a wrench or pliers and remove the gasket. If possible, buy the same. You can cut it out of thin rubber or cushioning material, which is bought in advance in the store.
 Another reason why the tap can be passed is a foreign object caught between the seat and the spool. Enough to remove this garbage. Rarely, but it does happen that a crack appears on the saddle due to factory defects. How to fix it will depend on the specific case. Sometimes a crack appears on the body itself, through which water begins to flow out, this mainly happens with cast-iron models. In this case, it will not be possible to fix it; it will have to be replaced.
Other bathroom items
The next design that can be used in everyday life is a cone crane. Its feature is the structure of the spool. It is made in the form of a cone and does not move relative to the saddle, but rotates in it. This became possible due to the fact that the body itself is the saddle. Water passes through the longitudinal slots in the body and spool. Such a current tap is easily repaired by tightening the nut, which is also located under the crank handle.
 Its difference from the stopcock lies in the speed of the closing process, because for this it is enough to turn the handle 90 degrees. There is a drawback - the high cost. The main malfunction is wear of the working surface, which can be eliminated if you rub these very surfaces, for example, using GOI paste.
Ball valves, due to their simplicity and reliability, are increasingly used. Structurally, they are similar to conical models, but the spool is a metal ball. To reduce friction between the seat and the spool, plastic rings are used in the first. To eliminate leaks that occur during operation, it is enough to change the gaskets or o-rings.Analysis of such a model is similar to analysis of other designs. The difference may be in the name of the parts, for example, a pen is used instead of a valve.
 Mixers allow you to mix water at different temperatures to achieve the desired value. Not a single bathroom can do without such a device. According to its design features mixers can be divided into two types:
- with one tap
- with two taps.
When using two taps, the mixer represents a tank with two inlets and one outlet. In the case of a single tap, the mixer is the tap itself. In such a model, a ball, which is both a slide valve and a mixer, has not two, but three holes. Two of them regulate the supply of cold and hot water, and the third - the pressure force. Before you understand why the mixer flows in the bathroom, you need to determine which model it belongs to.
In the first case, the connections between the taps and the mixer most often occur. To fix the problem, just tighten the nuts or replace the gaskets. If the housing itself is leaking, replace it. In the second case, the repair is similar to the repair of an ordinary crane.
The remaining bathroom set is a watering can, hoses and pipes. Water leakage is eliminated by replacing gaskets or tightening joints; their depressurization requires replacement. In case of more serious malfunctions, it is better to consult a specialist.